Summary
Wound closure is the approximation of wound edges with materials such as sutures, staples, wound tape, and/or tissue adhesive, and may be performed for the primary or tertiary closure of wounds. Primary wound closure is indicated for uncontaminated, recent wounds with easily approximated edges and a low risk for infection. Contaminated wounds may require secondary and/or tertiary wound closure, and more complex wounds may need specialist treatment. Special considerations may be required for pediatric patients and older adults.
For a comprehensive approach to the management of open wounds, see “Wound treatment.”
Overview
| Overview of wound closure techniques [1][2] | |||
|---|---|---|---|
| Description | Advantages | Disadvantages | |
| Suturing |
|
|
|
| Tissue stapling |
|
|
|
| Wound closure strips |
|
|
|
| Tissue adhesive |
|
|
|
Indications
Wound closure techniques are used to promote the healing of open wounds, preserve function, control bleeding, and achieve good cosmesis.
-
Indications for primary wound closure [1]
- Acute uncontaminated wounds with edges that can be approximated
- Recent wounds, typically defined as: [2][3][4]
- Extremities: within 6–10 hours of injury
- Scalp and face: within 10–12 hours of injury
-
Other applications of wound closure techniques
- Tertiary wound closure (delayed primary closure)
- Closure of surgical incisions
- Securing materials to the skin, e.g., surgical drain, bolster dressing
Contraindications
- There are no absolute contraindications to wound closure.
-
Relative contraindications for primary wound closure include:
- Contaminated wounds (despite cleaning and debridement, e.g., bite wounds)
- Old wounds
- Large wounds with irregular edges that cannot be approximated without tension
- Complex wounds that require repair by a specialist (see “Specialist consults for wounds”)
Consider secondary wound closure or repair by a specialist if primary closure is contraindicated.
We list the most important contraindications. The selection is not exhaustive.
Technical background
Suturing
Suture properties [1][2]
-
Absorbable
- Rapidly degrade in tissue; generally lose 50% of their strength within 1–4 weeks depending on the material
- Appropriate for deep dermal, mucosal, fascial, and subcuticular wounds
- Suture removal is usually not required.
-
Nonabsorbable
- Retain > 50% of their strength for several years
- Appropriate for superficial or percutaneous use and vessel ligations
-
Monofilament
- Suture consists of a single thread.
- Typically require four or more square knots to secure
-
Multifilament or braided
- Suture consists of several threads braided together.
- Typically require three square knots to secure
Consider absorbable sutures for patients who may have difficulty following up for suture removal (e.g., children) and for buried sutures (e.g., running subcuticular or deep dermal sutures). [1]
Suture size [1][2]
- Strength increases with suture diameter.
- Common sizes by wound location
- Fascia: 3-0 or 4-0
- Subcutaneous: 4-0 or 5-0
- Skin: 4-0 or 5-0
- Facial wounds: 6-0
- Areas under increased stress (e.g., joint surfaces, scalp): 3-0 or 4-0
Use the smallest suture that provides adequate strength to approximate the wound. [1]
Suturing techniques [1][5]
| Overview of suturing techniques | ||
|---|---|---|
| Description | Clinical application | |
| Simple interrupted suture |
|
|
| Simple running suture |
|
|
| Vertical mattress suture |
|
|
| Horizontal mattress suture |
|
|
| Deep dermal suture |
|
|
| Running subcuticular suture |
|
|
Avoid overtightening vertical and horizontal mattress sutures, as excess tension increases the risk of scarring and wound necrosis. [1][5]

Instrument handling technique [1]
-
Needle driver
- Thenar grip
- Needle driver is held in the palm of the hand with the index finger resting on the needle driver
- Thumb is placed distal to one hole with the middle, ring, and little fingers distal to the other
- Thumb-ring finger grip
- Index finger is placed in a similar position to the thenar grip technique
- Thumb and ring finger are placed in the rings
- Thenar grip
- Forceps: held in the nondominant hand like a pencil

Stapling device [1]
- A device that comes preloaded with stainless steel staples
- When the handle is squeezed, a staple is inserted into the tissue to approximate the wound edges.
Tissue adhesive [6][7]
- Made from liquid monomers that polymerize upon contact with tissue to form a stable bond
- Lasts 5–10 days and gradually sloughs off
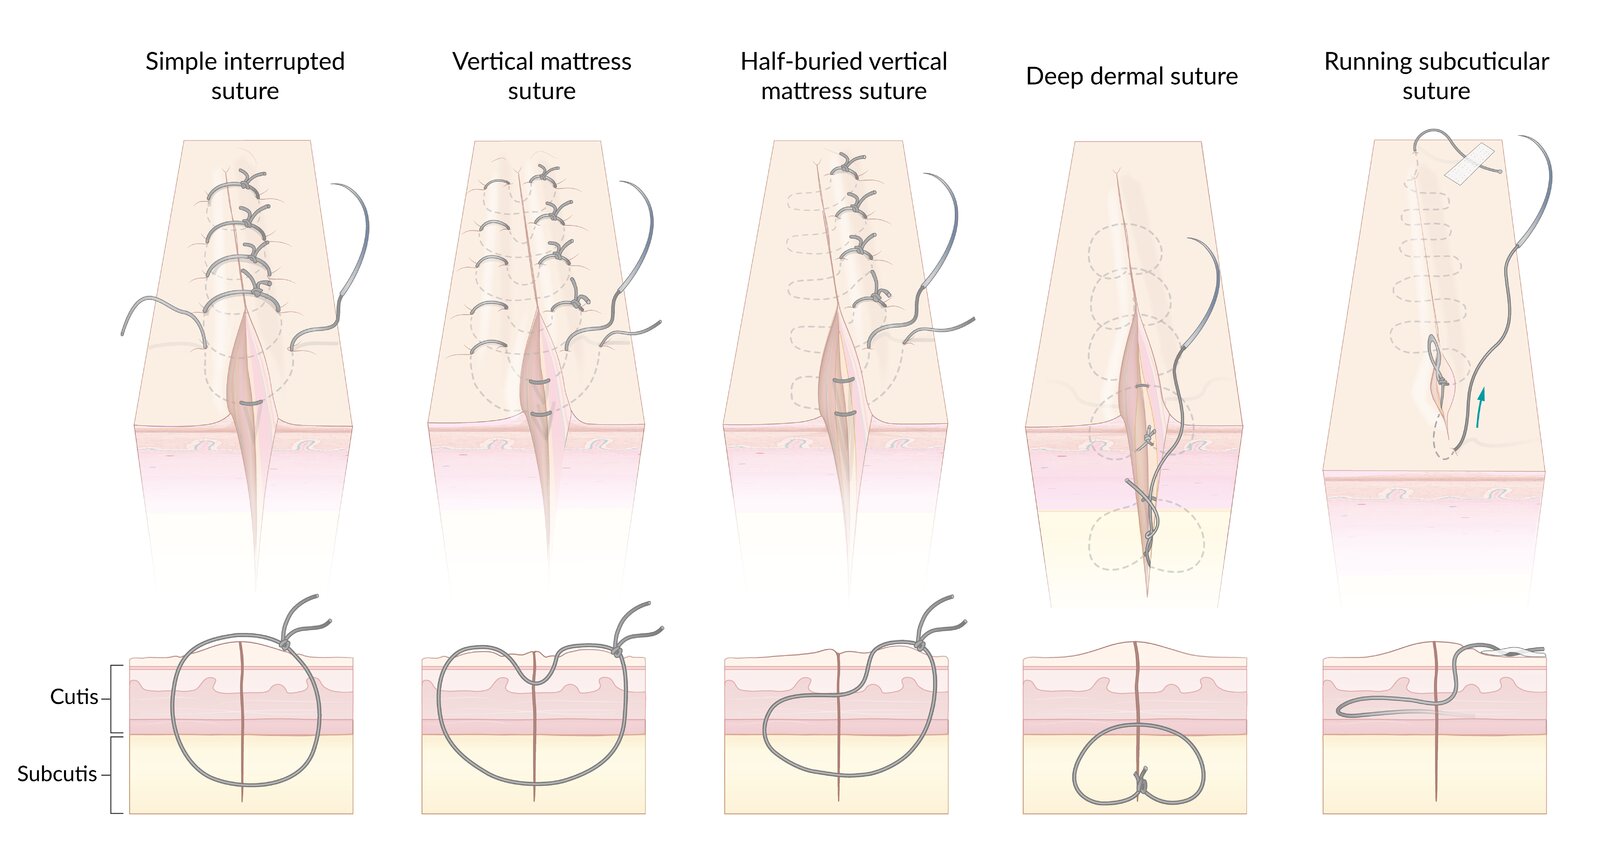
– Simple interrupted suture: simplest and most commonly used suturing technique for skin closure; suitable for wounds with minimal tension
– Vertical mattress suture: two stitches are placed in a far-far-near-near order, combining deep and superficial closure in a single stitch
– Half-buried vertical mattress suture: similar to vertical mattress suture but reduces the number of entry/exit points and so reduces scarring
– Deep dermal suture: used for approximation of deeper wound layers before performing skin closure with a different technique
– Running subcuticular suture: suture runs continuously within the cutis, minimizing entry/exit points. Only suitable for wounds with low tension and good apposition of the wound edges (often in combination with deep dermal sutures).
© AMBOSS
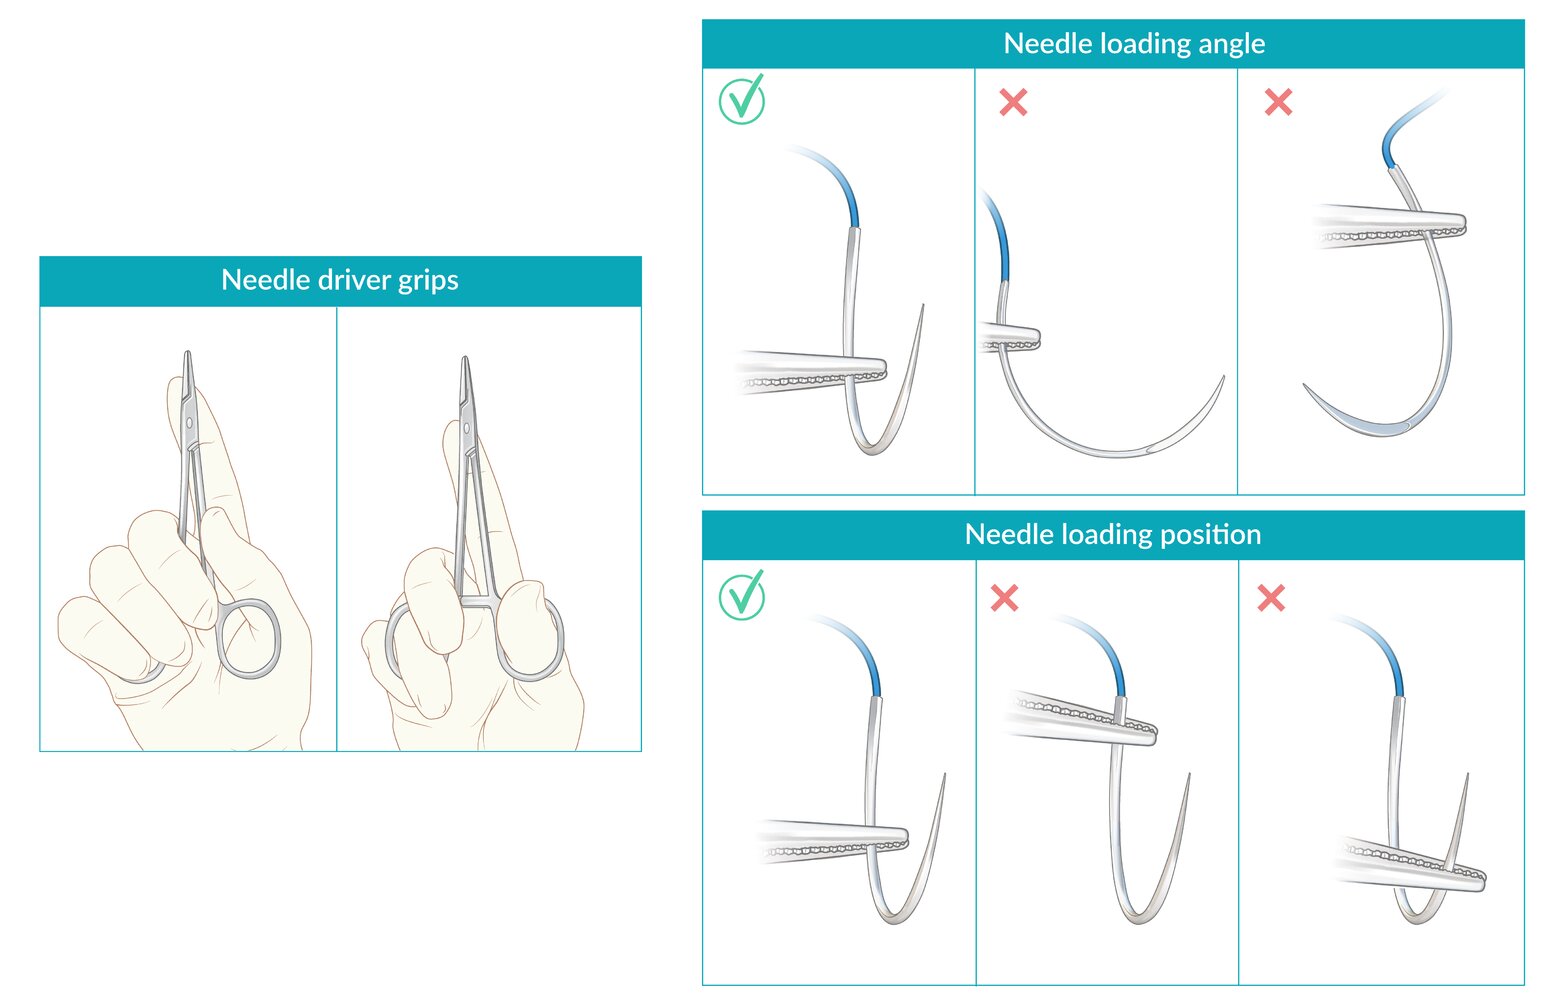
Needle driver grips:
Thenar grip (Left)
Thumb-ring finger grip (Right)
Needle loading angle: Needle is loaded perpendicular to the needle driver.
Needle loading position: Needle is grasped approximately 2/3 of the distance from the needle tip for optimal control.
© AMBOSS
Equipment checklist
All techniques [1]
- Clean or sterile gloves [2]
- Swabs or gauze
- Tissue forceps
- Sterile dressing
Suturing [1]
- Needle driver
- Suture scissors
- Appropriate type and size of suture (see “Technical background”)
- Appropriately sized syringe and needle (e.g., 25–27-gauge needle) for local anesthesia
- Local anesthetic (e.g., lidocaine)
Tissue stapling [1]
- Commercial stapling device
- Optional
- Appropriately sized syringe and needle for local anesthesia
- Local anesthetic (e.g., lidocaine)
- Staple removal kit
Wound taping [1]
- Wound closure strips
- Benzoin tincture
Tissue adhesive [1]
- Tissue adhesive

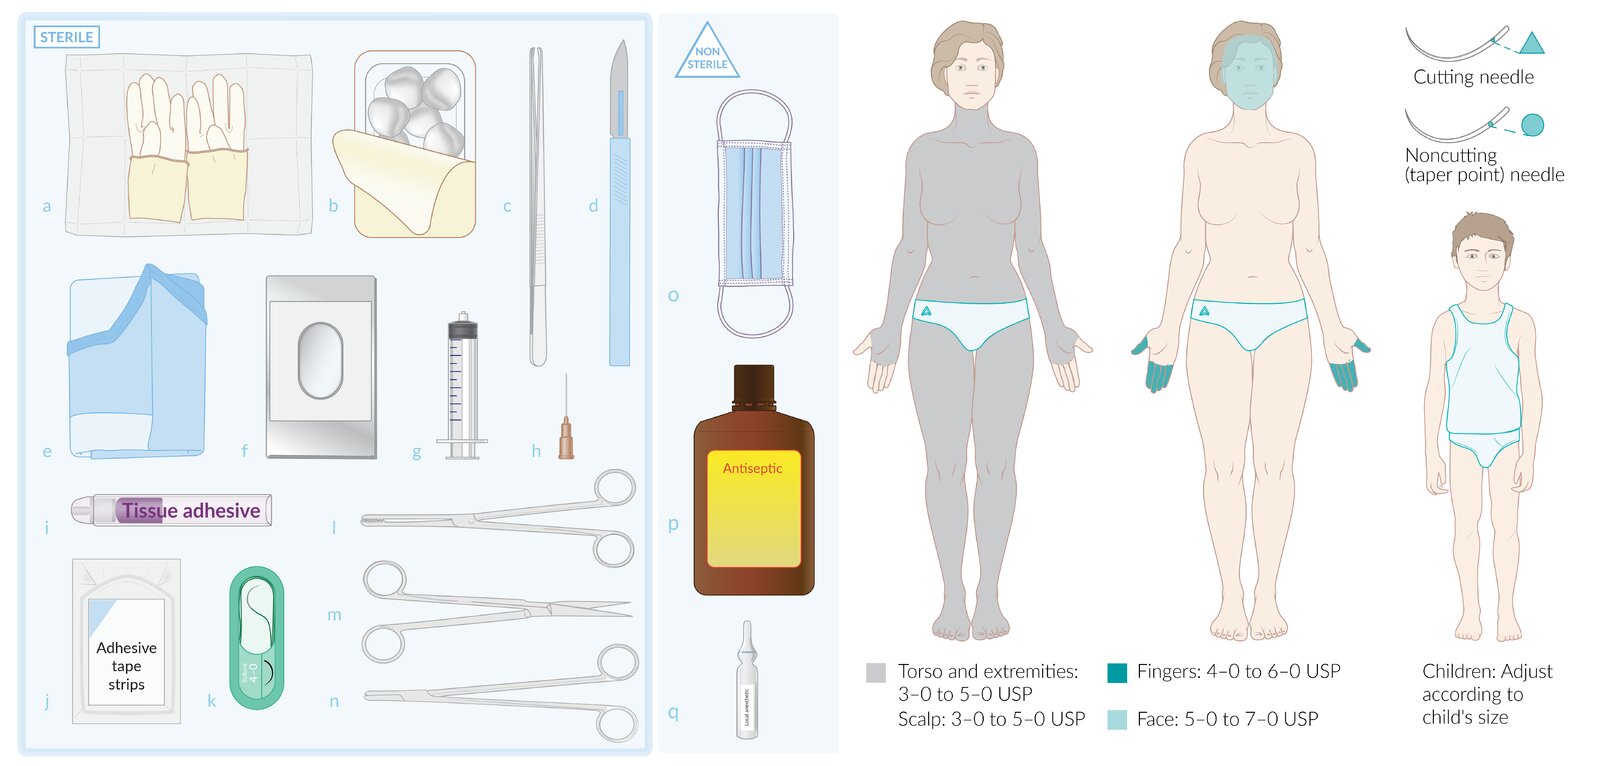
Sterile equipment (left): (a) gloves, (b) surgical swabs, (c) forceps, (d) scalpel, (e) surgical gown, (f) drape, (g) syringe, (h) hypodermic needle, (i) tissue adhesive, (j) wound closure strips, (k) suture, (l) blunt forceps, (m) scissors, (n) needle holder
Nonsterile equipment (middle): (o) mask, (p) antiseptic, (q) local anesthetic
Suture and needle selection (right)
– Suture size: depends on multiple factors, including the site of the wound
– Needle tip: depends primarily on the type of tissue to be sutured. Cutting needles (usually triangular tipped) are preferred for areas where the skin is tough (e.g., glabrous skin) while round tapered needles are preferred for softer skin (e.g., the face).
USP: United States Pharmacopeia
© AMBOSS
Preparation
- Initiate hemostatic measures.
- Perform a wound assessment.
- Obtain informed consent for the chosen wound closure technique.
- Perform skin preparation and create a sterile field around the wound. [1][2]
- Perform wound irrigation and debridement.
- Don PPE.

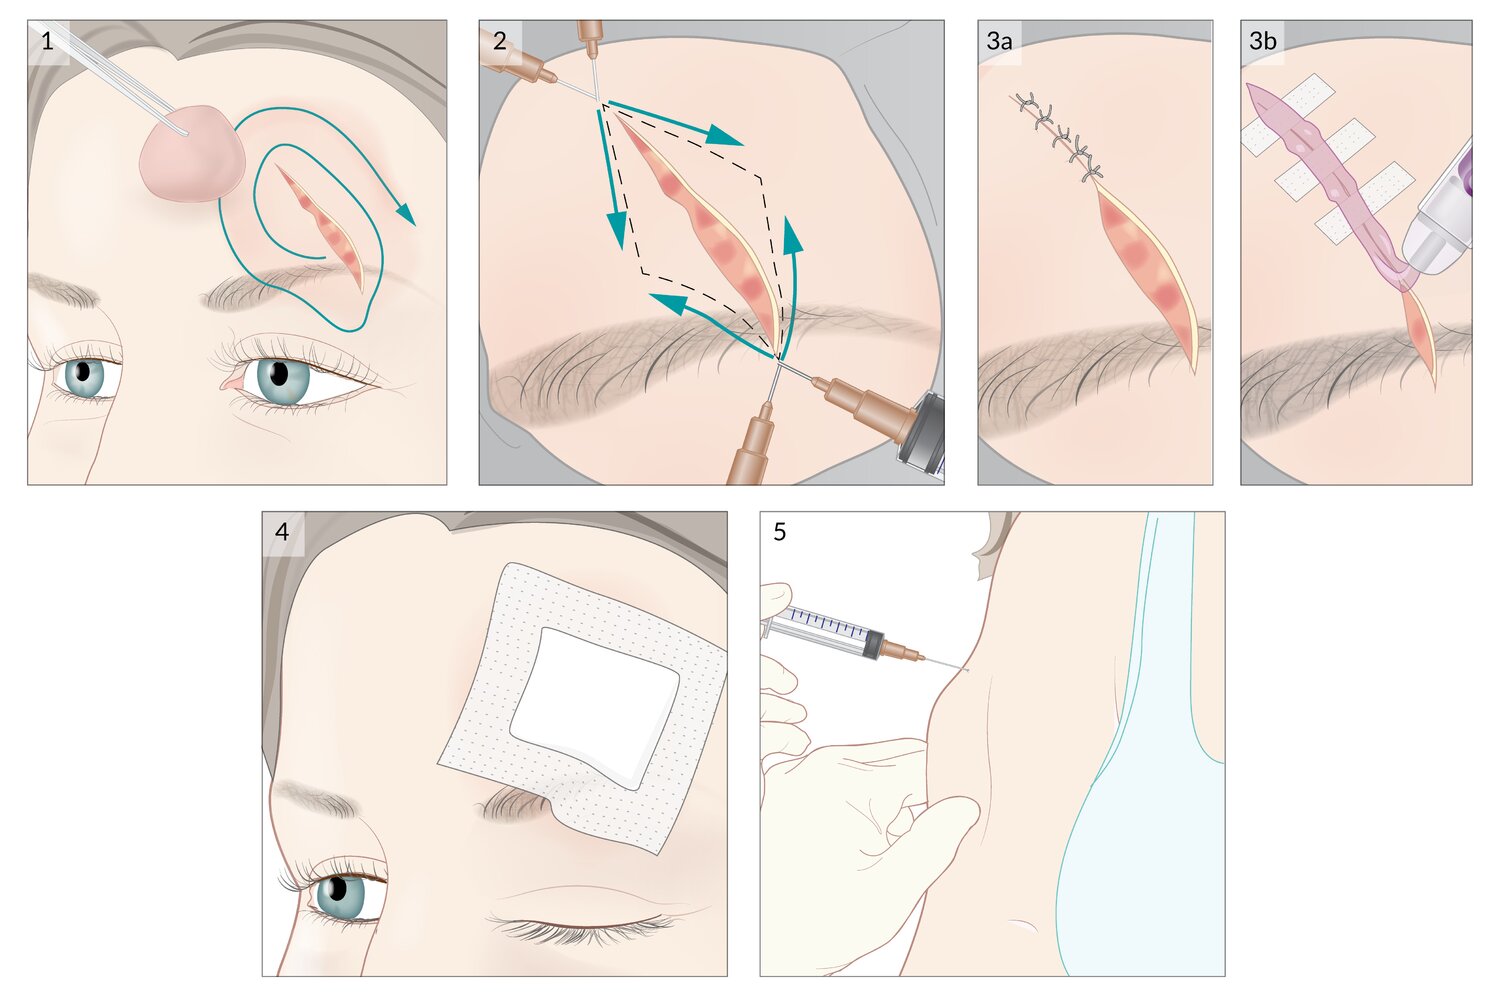
1. The wound is cleaned with water and a sterile field is created around it using a swab in a concentric motion, starting at the wound and moving outward.
2. Local anesthesia: The needle is advanced along the wound edges prior to injection; aspiration is attempted to avoid vascular infiltration of local anesthetic. The needle is then slowly withdrawn while local anesthetic is simultaneously injected.
3. Wound closure techniques: (a) simple interrupted sutures, (b) combination of wound closure strips and tissue adhesive
4. A sterile dressing is applied.
5. Tetanus prophylaxis is given if required.
© AMBOSS
Technique/steps
- Perform local anesthesia for wound repair.
-
Perform tension-free wound closure using one or more of the following:
- Suturing
- Tissue stapling
- Wound closure strips
- Tissue adhesive
- For wounds with irregular edges:
- Gently align the flaps and place interrupted sutures or single corner stitches to approximate the wound.
- Debride any devitalized or contaminated edges.
- Consider using tissue adhesive or wound closure strips in combination with sutures.
- Apply a sterile dressing.
- Immobilize the affected extremity, if necessary.

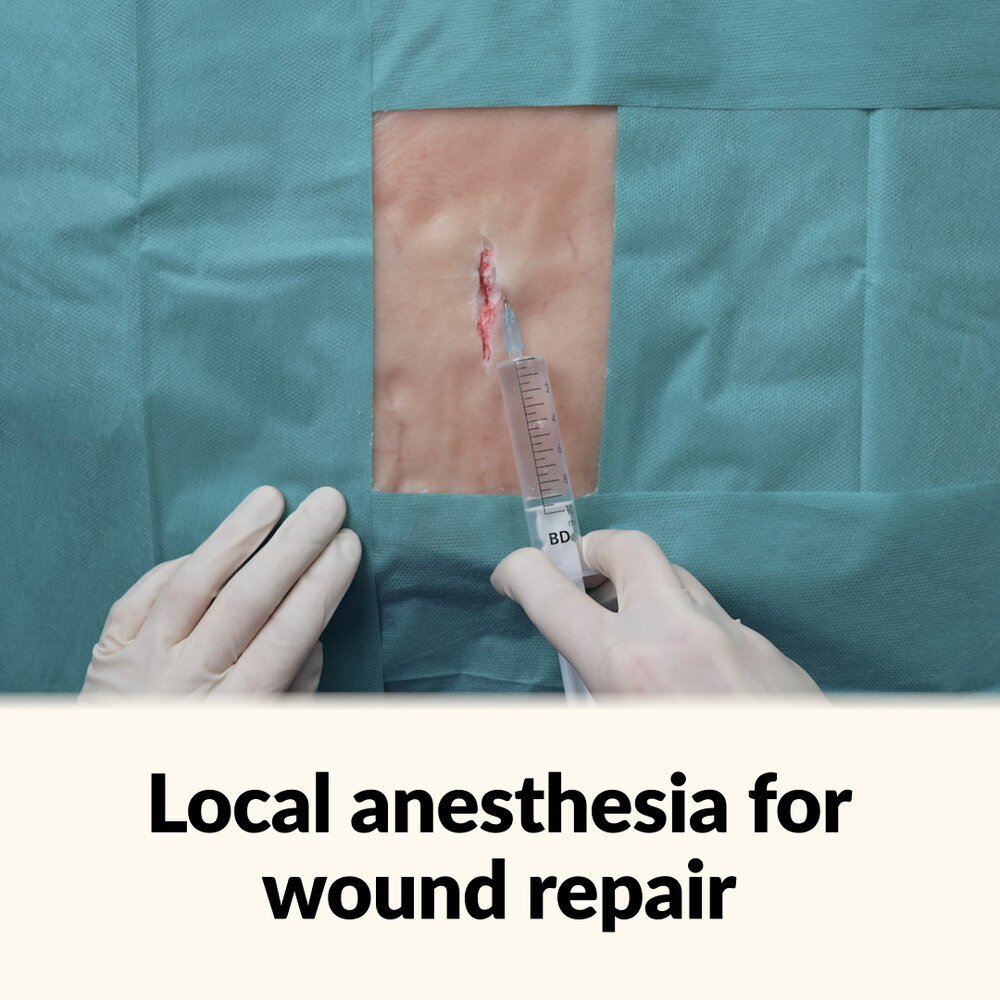
This video demonstrates how to perform local anesthesia for wound repair, including wounds requiring more than one anesthetic injection.
This video is part of a new AMBOSS format without voice/sound – optimized for quick clinical reference.
© AMBOSS
Suturing
Simple interrupted suture [1]
- Load the needle and suture into the needle driver.
- Insert the needle perpendicular to the skin (4–5 mm from the wound edge) and supinate the wrist so that the needle exits in the middle of the wound.
- Lift the opposite wound edge with forceps and, following the curvature of the needle, push the needle through the opposite side at an equal distance from the wound edge.
- As the needle exits the skin surface, grasp just below the tip with the needle driver and roll it out of the skin.
- Perform a two-handed or instrument tie.
- Repeat steps 1–5 until the wound is well approximated.

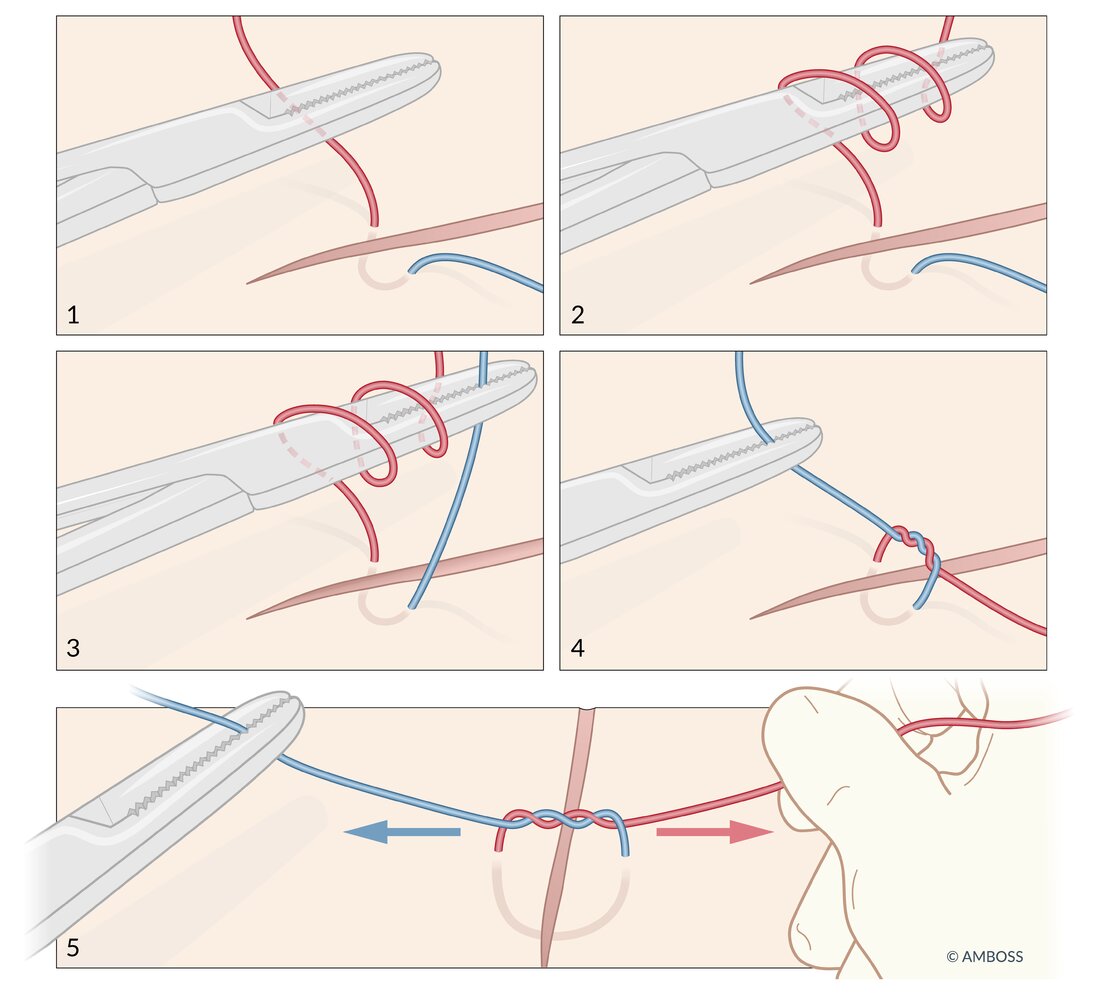
Instrument tie [1]
- Place the needle driver over the long end of the suture.
- Wrap the long end of the suture around the needle driver twice.
- Grasp the short end of the suture with the needle driver and pull it through the loops of the long end, tightening the knot just enough to approximate the wound edges.
- Repeat steps 1–3 twice more, alternating the direction of the loops with each throw, but only wrap the long end of the suture around the needle driver once.
- Cut the ends of the suture, leaving 1–2 cm tails.

Needle driver grips:
Thenar grip (Left)
Thumb-ring finger grip (Right)
Needle loading angle: Needle is loaded perpendicular to the needle driver.
Needle loading position: Needle is grasped approximately 2/3 of the distance from the needle tip for optimal control.
© AMBOSS
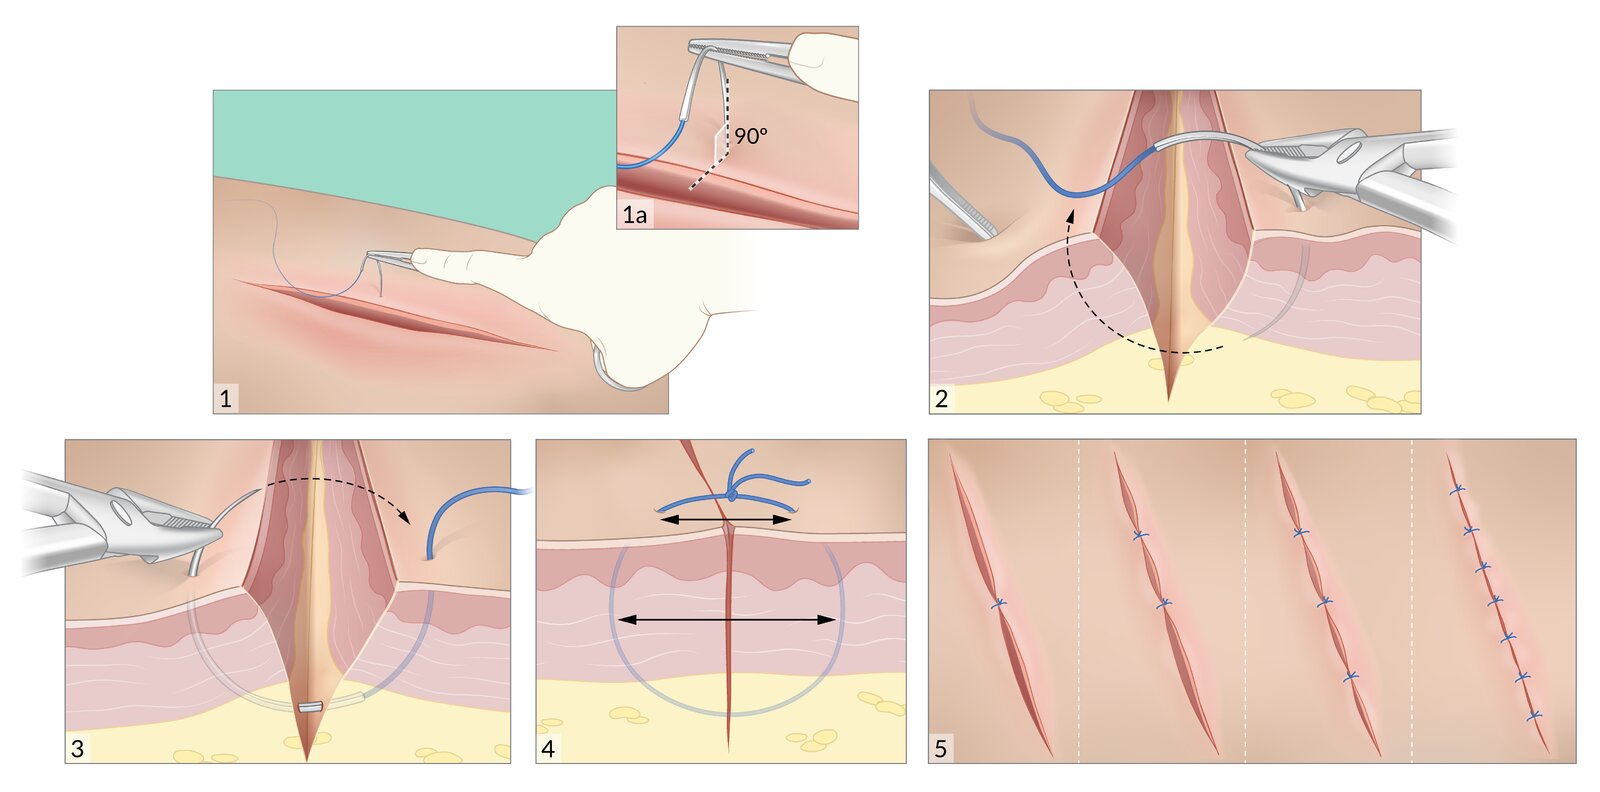
1. The needle is inserted perpendicular to the skin, approximately 4–5 mm from the wound edge.
2. The wrist is supinated to follow the curvature of the needle so that the needle exits through the skin on the opposite side of the wound, 4–5 mm from the wound edge.
3. The needle is grasped with the needle driver and rolled out of the skin.
4. The suture is tied so that the wound edges are well approximated. Note that the suture is equidistant from the wound edges on both sides and includes more subcutaneously than at the surface.
5. Additional sutures are added until the entire wound is well approximated. The spacing of the sutures depends on the wound.
© AMBOSS
© AMBOSS
Tissue stapling
- Evert and approximate the wound edges using forceps or gloved fingers.
- Place the center of the stapler perpendicular to the wound; the wound should be in the middle of the staple.
- Push gently on the skin and squeeze the handle to apply one staple.
- Continue to apply staples along the wound until it is well approximated.

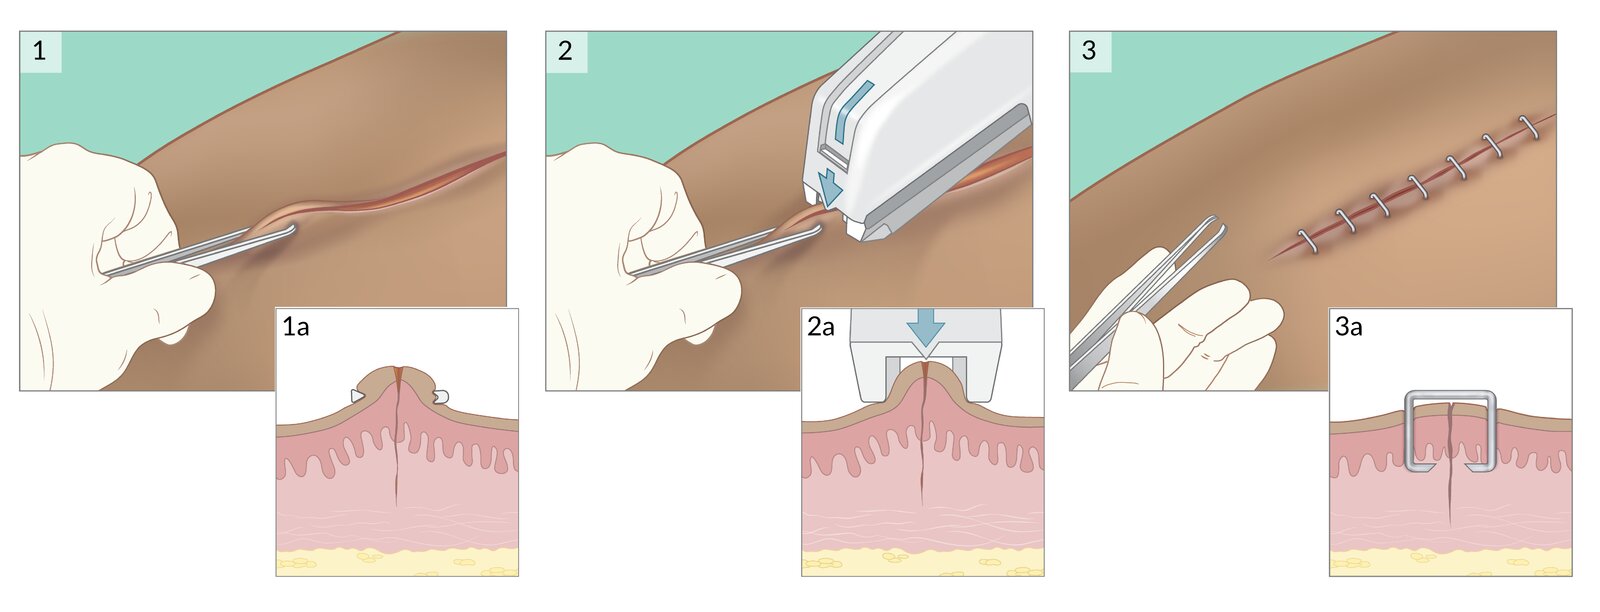
1. The wound edges are approximated and everted using forceps.
2. The center of the stapler is placed perpendicular to the wound, gently pushed onto the skin, and the stapler is squeezed to apply a staple.
3. The process is repeated along the length of the wound until it is well approximated.
© AMBOSS. See related article for detailed procedural guidance.
Wound closure strips
- Apply benzoin to the skin adjacent to the wound.
- Cut the strips so that they span 2–3 cm on each side of the wound.
- Peel the strip off of the backing.
- Place half of the strip on one side of the wound.
- Gently approximate the wound edges and apply the second half of the strip to the other side of the wound.
- Repeat steps 2–5 along the wound until it is well approximated.
Avoid using impermeable dressings with wound closure strips, as they can weaken the adhesion of the tape. [1]

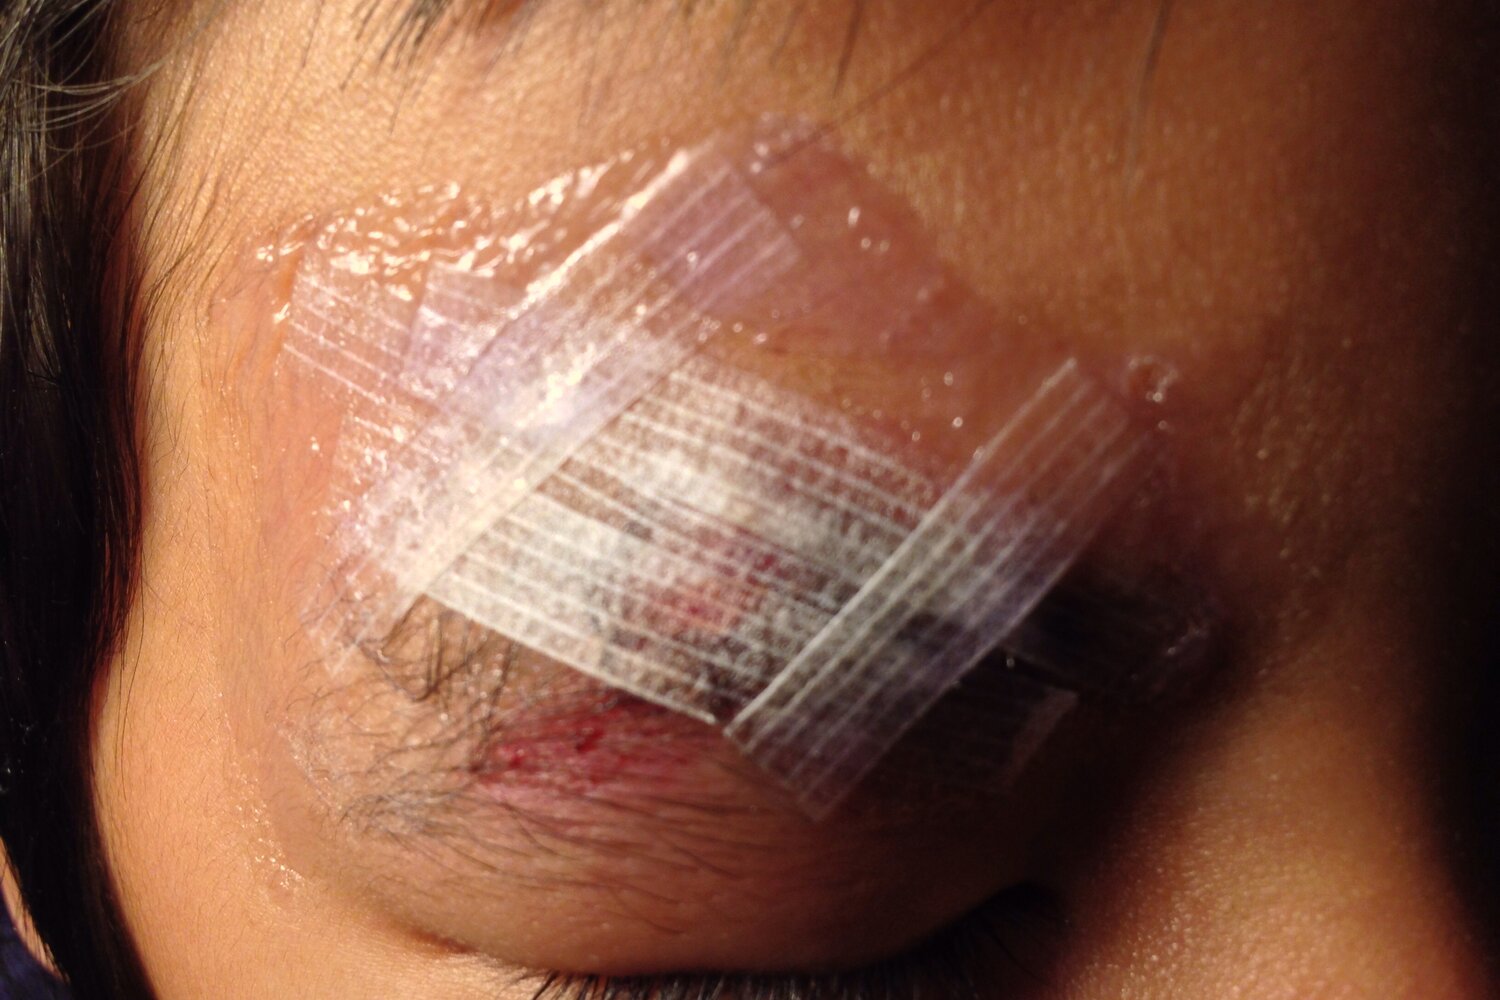
An injury above the patient's right eyebrow has been treated with wound closure strips and glue.
Wound closure strips, also known as “butterfly closures” or under the genericized brand names “Steri-Strips” or “Leukostrips,” are nonelastic surgical tape strips that can be used instead of sutures for low-tension lacerations or surgical incisions.
Source: “Steri-Strip tape and glue” by Z22, Wikimedia Commons, licensed under CC BY-SA 4.0.

Tissue adhesive
- Approximate the wound edges.
- Apply a thin layer of adhesive over the length of the wound with a 5–10 mm margin on either side.
- Allow 1–2 minutes of drying time before considering additional layers of adhesive.
- Apply a nonocclusive dressing.

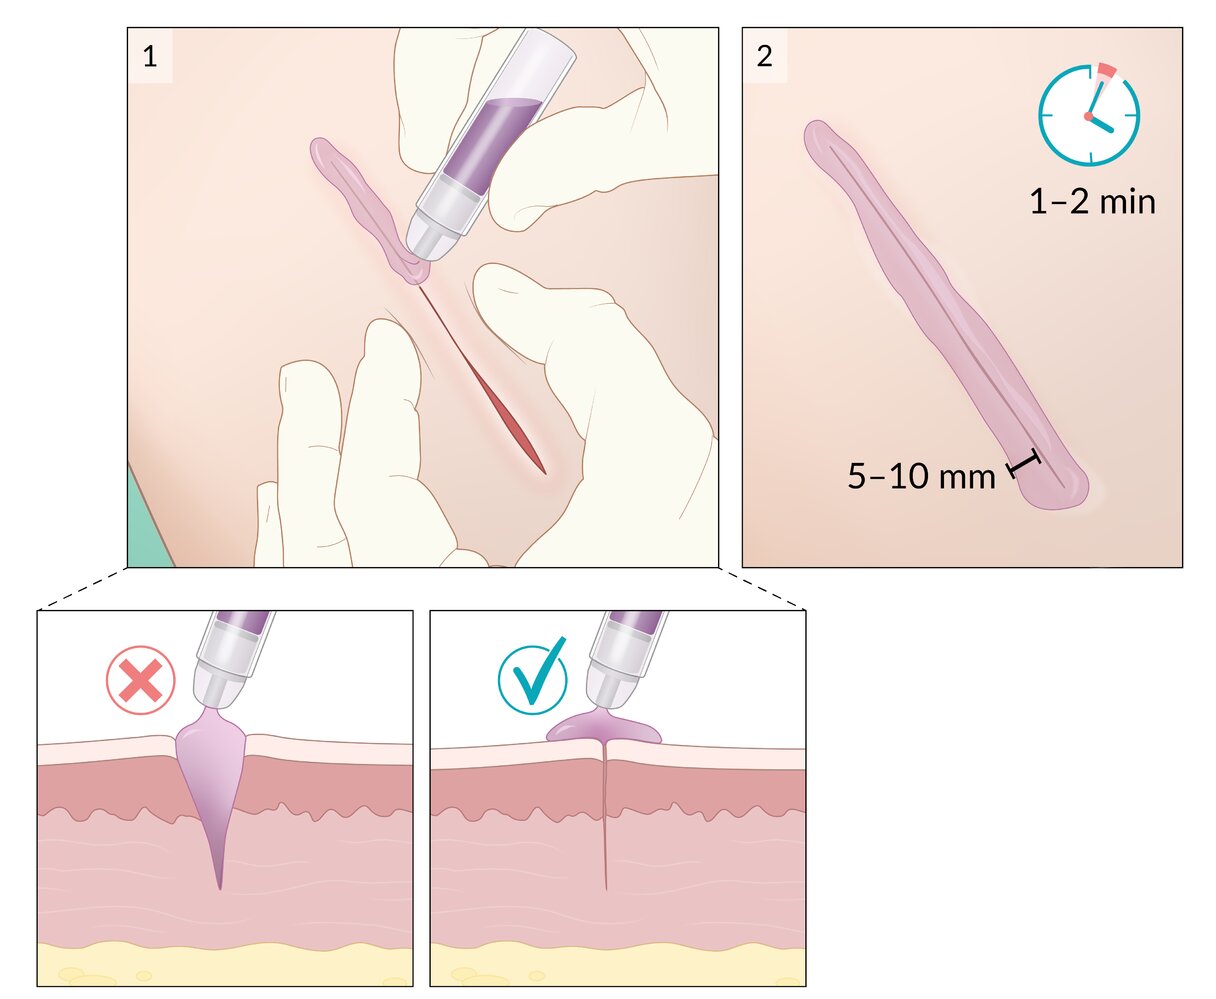
1. With the wound edges approximated, a thin layer of adhesive is applied over the length of the wound. The adhesive must not be applied to the inside of the wound.
2. There is a 5–10 mm margin of adhesive around each side of the wound; it requires 1–2 minutes to dry.
3. Additional layers of adhesive may be applied if needed.
© AMBOSS. See related article for detailed procedural guidance.
Pitfalls and troubleshooting
Suturing [1]
- Needle size: If significant force or twisting is required to advance the needle, try a larger size.
- Suture tension: Apply the minimum amount of tension that will approximate the wound; excessive tension compromises the blood supply and increases the risk of necrosis and infection.
- Dull needle: Avoid grasping the needle tip; if dulled, use a new needle.
Tissue stapling [1]
-
Difficulties during application
- Ensure that the wound edges are everted and the staple is aligned prior to stapling.
- Consider having a staple removal kit at hand to remove any misplaced staples.
-
Wound dehiscence or poor cosmesis
- Avoid applying excessive pressure to the skin when inserting a staple.
- Use sutures instead of staples for full-thickness wounds.
Wound closure strips [1]
-
Wound dehiscence
- Apply benzoin prior to applying wound tape to aid adhesion.
- Avoid covering the wound with an impermeable dressing or adhesive bandage.
- Instruct the patient to minimize tension on the area and to keep it dry.
- Skin blistering: Avoid stretching the tape too tightly across the wound.
Tissue adhesive [1][8]
-
Difficulties during application
- Position the patient such that any excess adhesive will not run into sensitive areas (e.g., the eyes).
- Use a wet gauze or petroleum jelly barrier to prevent runoff of excess adhesive.
- Adhesive that has set can be removed using antibiotic ointment, petroleum jelly, or acetone.
-
Wound dehiscence
- Avoid using only adhesive for wounds under tension or areas that move significantly with regular activity.
- Hold the wound edges in close approximation until the adhesive has dried.
- Instruct patients to avoid the use of ointments, rubbing, and immersion of the wound.
Postprocedure checklist
- Hemostasis achieved
- Appropriate wound dressing applied
- Tetanus prophylaxis given if necessary
- Follow-up plan for suture or staple removal discussed with the patient (see also: “Follow-up for open wounds”)
Complications
-
Patient
- Retained foreign body
- Neurovascular injury
- Wound infection
- Wound dehiscence
- Seroma or hematoma
- Hypertrophic scarring
- Provider: needlestick injury
We list the most important complications. The selection is not exhaustive.
Special patient groups
Wound closure in children [9][10]
- Consider the following to reduce pain and anxiety:
- Topical anesthesia (e.g., lidocaine with/without epinephrine, or tetracaine gel)
- If local anesthetic is used, minimizing the pain associated with injection (see “Pitfalls and troubleshooting” in “Local anesthesia”)
- Hair apposition technique for scalp lacerations
- Offering caregivers the opportunity to assist (e.g., comforting the child)
- Providing a distraction (e.g., music, videos, bubble blowing)
- Maintain a high index of suspicion for retained foreign bodies.
- Ensure that caregivers are provided with return precautions and wound care instructions.

Wound closure in older adults [1]
- Skin thinning may prevent the use of conventional primary wound closure.
- Minimize trauma: Handle fragile skin gently, use smaller sutures, and consider noninvasive methods of wound closure (e.g., adhesive, strips).
- Support the wound edges: Consider reinforcement of the skin prior to suturing.
- Place wound closure strips parallel to and 1 cm away from the wound edges.
- Approximate the wound edges by suturing through the strips.
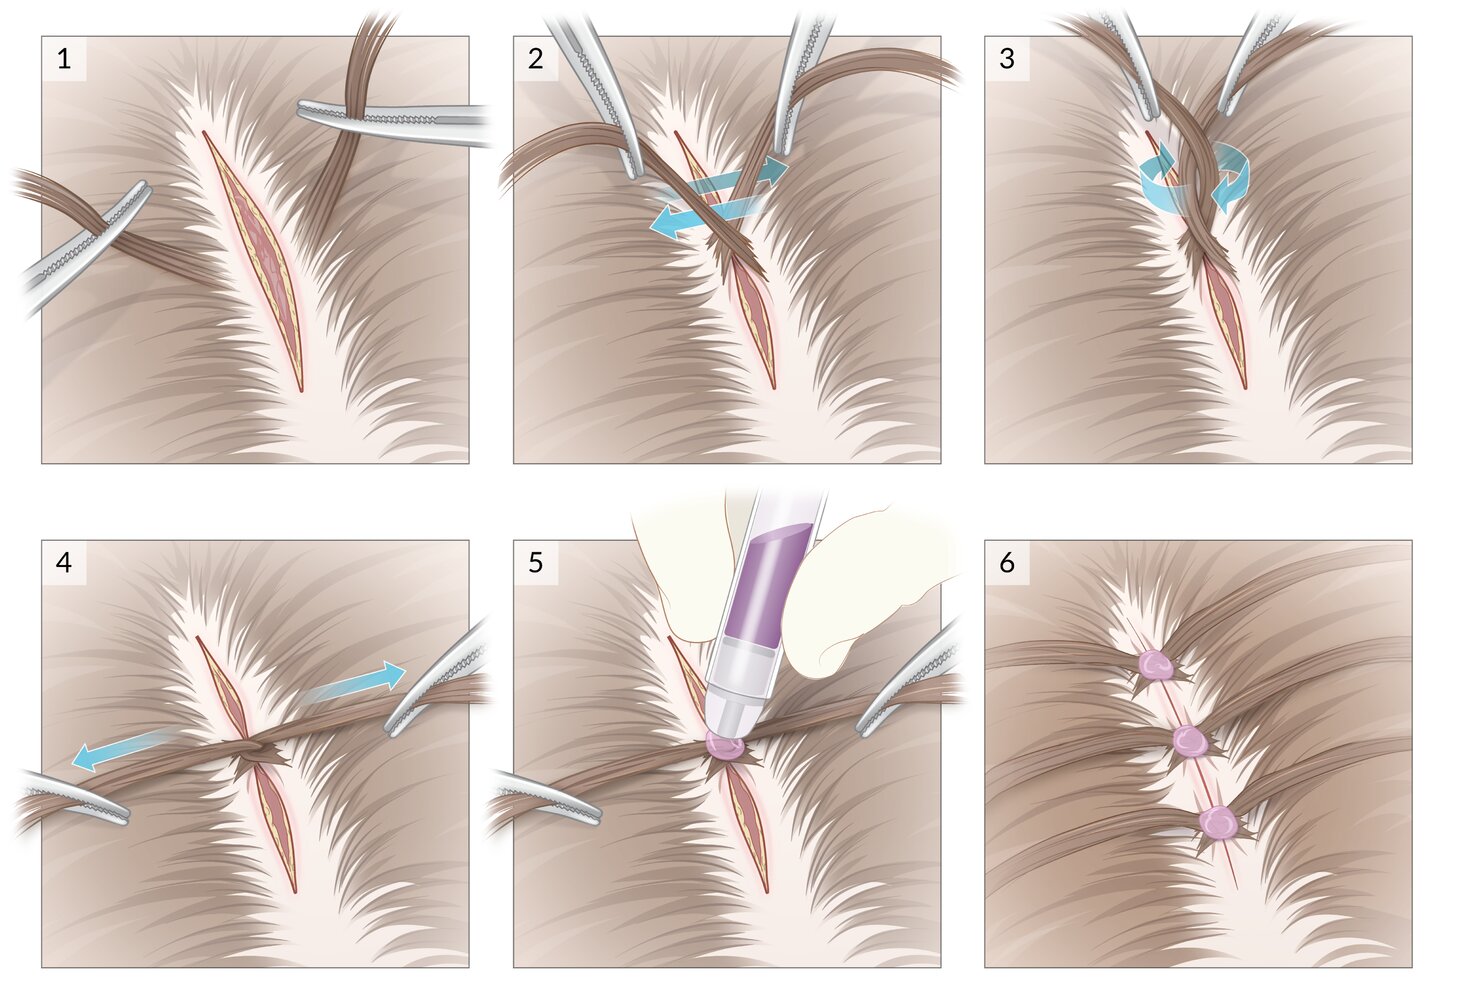
1. Several strands of hair from opposite sides of the wound are grabbed using hemostats.
2. The strands are crossed over the wound.
3. The strands are interlocked with a 180° or 360° twist.
4. The twist is pulled taut, apposing the wound edges.
5. A drop of tissue adhesive is applied over the base of the twist. Tension on the hair strands is held until the adhesive has dried.
6. This process is repeated every 1-2 cm along the entire wound.
© AMBOSS. See related article for detailed procedural guidance.
References
- Roberts JR. "Roberts and Hedges' Clinical Procedures in Emergency Medicine and Acute Care". Elsevier. (2018). ISBN: 9780323354783
- Childs DR, Murthy AS. "Overview of Wound Healing and Management". Surg Clin North Am. 97(1). :189-207. (2017)
- Forsch RT, Little SH, Williams C. "Laceration Repair: A Practical Approach". Am Fam Physician. 95(10). :628-636. (2017)
- Nicks BA, Ayello EA, Woo K, Nitzki-George D, Sibbald RG. "Acute wound management: revisiting the approach to assessment, irrigation, and closure considerations". Int J Emerg Med. 3(4). :399-407. (2010)
- Zuber TJ. "The mattress sutures: vertical, horizontal, and corner stitch". Am Fam Physician. 66(12). :2231-6. (2002)
- Farion KJ, Russell KF, Osmond MH, et al. "Tissue adhesives for traumatic lacerations in children and adults". Cochrane Database Syst Rev. 2010(1). (2002)
- Bruns TB, Worthington JM. "Using tissue adhesive for wound repair: a practical guide to dermabond.". Am Fam Physician. 61(5). :1383-8. (2000)
- Walls R, Hockberger R, Gausche-Hill M, Erickson TB, Wilcox SR. "Rosen's Emergency Medicine 10th edition- Concepts and Clinical Practice E-Book". Elsevier Health Sciences. (2022). ISBN: 9780323757904
- Lambert C, Goldman RD. "Pain management for children needing laceration repair". Can Fam Physician. 64(12). :900-902. (2018)
- Ali S, McGrath T, Drendel AL. "An Evidence-Based Approach to Minimizing Acute Procedural Pain in the Emergency Department and Beyond". Pediatr Emerg Care. 32(1). :36-42. (2016)